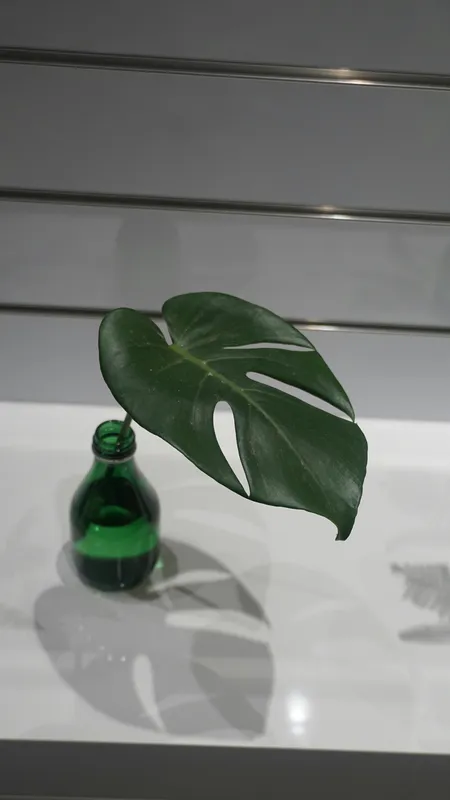
To propagate Monstera deliciosa, take a healthy section of main stem that includes a node. A leaf and its stalk can remain attractive in water, but they are not a complete stem cutting. An aerial root is useful, yet it is not a substitute for the node. Make a clean cut, then root it in water or an airy medium under warm, bright indirect light.
Find the node before making any cut
Trace one leaf inward from its blade. The narrow stalk holding that leaf is the petiole. The petiole meets the thicker, jointed main stem at a node. A node may look like a raised ring or knuckle and may include a leaf scar, a small axillary bud, or an aerial-root nub.
These structures have different jobs:
- Node: a section of main stem associated with a leaf and bud. University of Illinois Extension describes a node as the place where a leaf emerges, often visible as a raised area.
- Axillary bud: a small growth point at or near the node that can produce the next shoot. It may be subtle on an older or recently cut stem.
- Aerial root: a true root that emerges from the vine stem. The University of Florida IFAS description distinguishes Monstera’s cylindrical vine, leaf scars, and long cord-like aerial roots.
- Petiole: the stalk between leaf blade and main stem. A petiole is not the main vine and does not contain a stem node by itself.
An aerial root often makes a node easier to find, but “has a brown root” is not enough. Confirm that the cutting includes a section of the thick main stem. Extension guidance identifies a stem cutting, rather than a leaf cutting, as the propagation method for Monstera. Without a viable stem node, there is no dependable growth point for a new vine.
Choose a healthy cutting
Start with a plant free of pests, spreading lesions, and soft stem tissue. Select a manageable section with an unmistakable node and healthy leaf. An aerial root is an advantage when available. The University of Connecticut Monstera profile describes an ideal cutting as being taken below a node with aerial roots present.
Prepare:
- sharp pruners or a knife suited to the stem’s thickness;
- soap, water, and a tool disinfectant used according to its label;
- gloves and either a clean jar or a draining pot with fresh medium.
Clean and disinfect the blade before cutting and between plants. University of Illinois Extension’s propagation guidance emphasizes clean containers, disease-free media, and sharp sanitized tools. Cut through the main stem below the node without crushing the tissue or cutting through the bud, then begin rooting promptly.
Method 1: root the Monstera cutting in water
Water makes the stem base and new roots visible, but those roots must later adjust to potting mix.
- Wash the jar and fill it with clean room-temperature water.
- Place the node and any short aerial root in the water. Keep the leaf blade and petiole above the waterline, and avoid submerging more stem than necessary.
- Set the jar in bright indirect light, away from hot direct sun and heating or cooling vents.
- Replace the water once or twice each week, and sooner if debris or odor develops. Keep new roots submerged and inspect for soft tissue.
Iowa State University Extension and Outreach recommends frequent water changes and transplanting when roots are about an inch long. Water-formed roots are coarser and may show stress when moved to potting mix, so a jar full of long roots is not the goal.
Method 2: root in an airy medium
The medium must hold the cutting upright while retaining moisture and air. Iowa State lists perlite, coarse sphagnum moss, vermiculite, sand, and blends with different water-holding behavior. Use a clean product, not reused mix.
- Choose a small container with drainage holes and pre-moisten the medium evenly.
- Make a hole so the stem is not scraped during insertion.
- Place a node against or just within the medium. Keep the leaf, petiole, and growing tip above it; guide an aerial root in without sharply bending it.
- Firm the medium enough to support the cutting, then let excess water drain.
- Keep the medium evenly damp, never saturated. Check with a finger or wooden skewer rather than watering on a fixed schedule.
- Provide warmth, bright indirect light, and moderate humidity. Vent any clear cover regularly.
This route hides early roots, so monitor stem firmness, moisture, and eventual shoot growth. Do not tug on the cutting; temperature, light, and cutting condition all change the pace.
Water or medium: which is better?
| Priority | Water | Airy propagation medium |
|---|---|---|
| See roots and stem condition | Easy | Limited without disturbing the cutting |
| Moisture management | Water level is obvious | Requires checking dampness and aeration |
| Disease warning | Cloudiness, odor, and soft tissue are visible | Rot may remain hidden longer |
| Move to a regular pot | Requires adaptation from water | Roots already formed around solid particles and air spaces |
Neither method repairs a missing node or unhealthy stem. Water favors observation; medium avoids a later change in root environment but requires reliable moisture judgment.
Move a water-rooted cutting to potting mix
Transplant after several healthy roots are roughly an inch or longer. Choose a small draining pot and fresh houseplant mix with coarse material for air space. An oversized pot can stay wet around the small root system.
Pre-moisten the mix, spread the roots gently, and fill around them. Keep the node near the surface; do not bury the petiole or growing tip. Water once and let it drain fully.
For the first few weeks, keep the mix lightly moist while the roots adjust. Maintain bright indirect light and stable warmth. Temporary wilting or one yellowing older leaf can occur; judge progress by a firm stem and continuing root or shoot activity. Delay fertilizer until growth resumes.
Read failure signs early
- Soft, dark, translucent, or foul-smelling stem: treat it as rot. Clean the setup and recut only if firm stem with a viable node remains.
- Cloudy or smelly water: replace it, wash the vessel, and inspect the submerged tissue. Cloudiness alone does not prove the whole cutting is lost.
- Surface mold or persistently soaked medium: increase air exchange and correct excess moisture.
- No roots, but a firm stem: reassess warmth and bright indirect light, then allow more time without switching methods repeatedly.
- Roots form but no shoot follows: confirm that the original piece included main stem and a viable node, not only a leaf, petiole, or detached aerial root.
- A yellow leaf with a firm node: reduce other stressors and monitor; this differs from rot at the growth point.
Discard tissue that is fully soft or lacks a viable node. Do not compost a cutting with a suspected contagious plant disease unless local guidance confirms that is appropriate.
Handle Monstera sap and cuttings safely
Monstera is not a chew-safe plant. The ASPCA Animal Poison Control Center lists Monstera deliciosa as toxic to cats and dogs because of insoluble calcium oxalates; signs can include oral burning, drooling, vomiting, and difficulty swallowing. University of Florida IFAS also warns that Monstera sap and plant parts can irritate the mouth, throat, eyes, skin, and digestive tract in people and pets.
Wear gloves while cutting, keep hands away from the face, clean sap from tools and work surfaces, and keep plants and vessels beyond the reach of children and animals. If a person or pet chews the plant or develops symptoms, contact the appropriate poison-control service, medical professional, or veterinarian rather than attempting a home remedy.
Sources
- Cuttings (University of Illinois Extension). Accessed August 24, 2026.
- Propagation (University of Illinois Extension). Accessed August 24, 2026.
- How to Propagate Houseplants by Stem Tip Cuttings (Iowa State University Extension and Outreach). Accessed August 24, 2026.
- Monstera Growing in the Florida Home Landscape (University of Florida IFAS Extension). Accessed August 24, 2026.
- Monstera deliciosa (University of Connecticut Home and Garden Education Center). Accessed August 24, 2026.
- Toxic and Non-Toxic Plants: Swiss Cheese Plant (ASPCA Animal Poison Control Center). Accessed August 24, 2026.
- Common Poisonous Houseplant Species in Florida (University of Florida IFAS Extension). Accessed August 24, 2026.