How to Stake and Support Your Climbing Houseplants (Without Making a Mess)
Here is the thing about climbing houseplants that nobody tells you when you buy that cute little monstera at the store: it wants to climb. Like, really wants to climb.
In the wild, plants like monstera, philodendron, and pothos scramble up tree trunks toward the canopy. Those aerial roots poking out everywhere are not a cry for help - they are the plant’s way of saying “give me something to grab onto.” And when you do? The leaves get bigger, the growth gets faster, and the whole plant looks happier.
I learned this the hard way when my Monstera deliciosa started leaning so far sideways it knocked over a framed photo of my son’s first birthday. That was the week I became a moss pole convert.
So let me walk you through everything I know about supporting your climbing plants - what works, what does not, and what I wish someone had told me before I zip-tied a monstera to a broomstick. (Yes, that happened.)
Why Climbing Plants Need Support
Most popular climbing houseplants are epiphytes. In the wild, they grow on other plants and trees - not in pots on your shelf. When you give them something to climb, a few good things happen:
- Bigger leaves. Monstera and philodendron leaves can grow significantly larger when the plant climbs versus trails.
- Stronger stems. Vertical growth encourages thicker, sturdier stems.
- Better aerial root development. Roots that attach to a support help the plant absorb moisture and nutrients.
- Less flopping. Nobody wants a plant that faceplants off the shelf every other week.
If you have a monstera, philodendron, syngonium, pothos, or any aroid with aerial roots, giving it support is one of the best things you can do.
The Main Types of Plant Supports
There are more options than you might think. Here is a breakdown of the most common ones, with honest pros and cons.
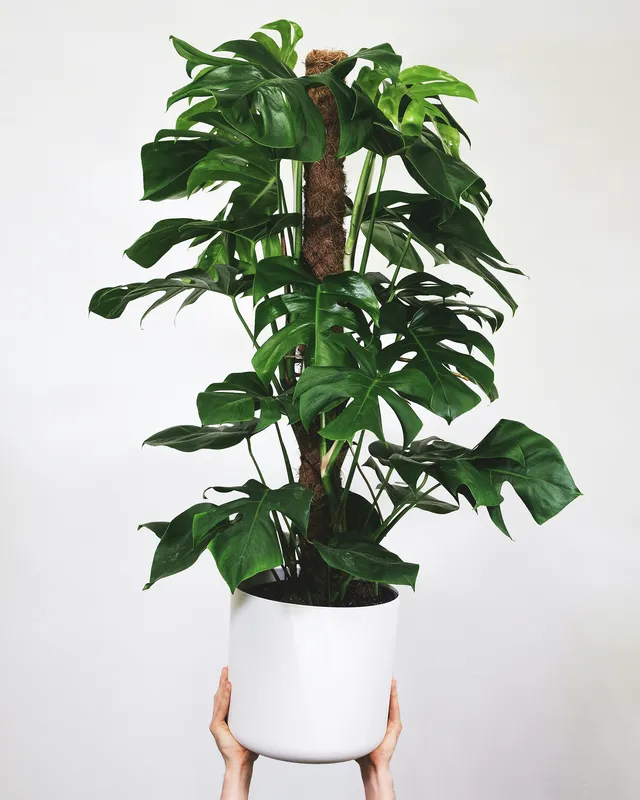
Moss Poles (Sphagnum Moss)
The classic choice. A moss pole is a PVC pipe or wooden dowel wrapped in sphagnum moss and held together with fishing line, wire, or a mesh sleeve.
What is great about them:
- Sphagnum moss retains moisture, which encourages aerial roots to dig in and attach naturally.
- When roots embed in the moss, the plant gets extra moisture and nutrients. This is the closest you can get to mimicking a tree trunk in the wild.
- Widely available at garden centers and online.
What is not so great:
- You need to keep the moss moist, which means regular misting or a drip system. Dry moss does not do much.
- Once roots grow into the pole, you cannot easily remove or reposition it without damaging the plant.
- Sphagnum moss harvesting raises sustainability concerns. It takes decades to regenerate in peat bogs.
- They can get a little messy and sometimes attract fungus gnats if kept too wet.
Best for: Monstera deliciosa, Monstera adansonii, large philodendrons - basically any plant with thick aerial roots that you want to get really attached (literally).
Coco Coir Poles
Think of these as the low-maintenance cousin of the moss pole. A coco coir pole is a stake wrapped in coconut fiber instead of sphagnum moss.
What is great about them:
- More sustainable than sphagnum moss. Coco coir is a byproduct of coconut processing.
- Very sturdy and durable. They hold up well over time without breaking down.
- You do not need to keep them moist - they work as structural support even when dry.
- Easy to move or replace since roots do not embed as deeply.
What is not so great:
- Aerial roots are less likely to dig in and attach compared to moist sphagnum.
- You will probably need to use plant ties or velcro strips to keep the plant in place.
- Does not provide the same moisture benefit as a moss pole.
Best for: Plants that need structural support but do not have aggressive aerial roots. Also great if you tend to forget about plant maintenance (no judgment, we have all been there).
Bamboo Stakes and Wooden Dowels
The simplest and cheapest option. Just a straight stick in the pot.
What is great about them:
- Cheap and easy to find. You probably have a chopstick that could work in a pinch.
- Clean looking. A simple bamboo stake can be almost invisible behind the foliage.
- Great for smaller plants or young climbers that just need a little guidance.
What is not so great:
- No moisture retention. Aerial roots will not attach to a smooth surface.
- Less stable for heavy or mature plants.
- Wood can rot over time in damp soil, especially if it is not cedar.
Best for: Younger plants, temporary support, or lighter climbers like pothos and syngonium.
Trellises and Planks
Flat trellises (wood, metal, or bamboo) and cedar planks offer a different climbing experience.
What is great about them:
- Flat surfaces give aerial roots more area to grip.
- Cedar planks are naturally rot-resistant and look beautiful.
- Great for plants with thinner, more flexible vines that can weave through a trellis.
- You can lean a plank against a wall for a dramatic vertical display.
What is not so great:
- Can be bulky in smaller pots.
- Metal trellises may not encourage root attachment.
- Planks work best when slightly moist, so they need occasional misting too.
Best for: Trailing-turned-climbing plants, display pieces, and anyone who wants their plant wall to look intentional.
How to Install a Support (Step by Step)
Here is my method, refined after many failed attempts and one incident involving a toppled plant, spilled soil, and my cat looking very guilty.
What you will need:
- Your support of choice (moss pole, coir pole, stake, etc.)
- Soft plant ties, velcro strips, or twine (avoid wire - it can cut into stems)
- A pot with room for the support
- Fresh potting mix if you are repotting at the same time
Steps:
1. Start at repotting time if possible. The best moment to add a support is when you are already repotting. This way you can push the pole deep into the soil without disturbing the roots.
2. Insert the support first. Push it down to the bottom of the pot so it is as stable as possible. If you are using a moss pole, position it toward the back or center of the pot.
3. Position the plant. Place the plant so the stems and aerial roots are close to the support. The growing point (the newest leaf) should face toward the pole.
4. Secure gently. Use soft ties to loosely attach the main stems to the support. Do not tie too tightly - the plant needs room to grow. Think “supportive hug,” not “chokehold.”
5. Tuck aerial roots. Gently guide any aerial roots toward the pole. You can pin them against the moss with a small piece of wire or a hairpin. (Pro tip from a dad: bobby pins work great.)
6. Water thoroughly. Give the plant a good drink after repotting to help the soil settle around the support.
7. Mist the pole (if using moss). If you went with a sphagnum moss pole, give it a good misting. You want the moss damp enough that roots will be attracted to it.
Common Mistakes (I Have Made Them All)
Adding the pole too late. If your monstera already has a massive root system, shoving a pole in can damage roots. Repotting time is the move.
Tying too tight. Stems grow thicker over time. If your ties are too snug, they will cut into the plant as it grows. Check and loosen ties every few months.
Letting the moss dry out completely. A bone-dry moss pole is just an expensive stick. If you are not going to keep it moist, save yourself the trouble and use a coir pole instead.
Using the wrong pot. A top-heavy plant on a moss pole needs a pot with some weight to it. Terracotta or ceramic works better than a lightweight plastic nursery pot. Nobody wants their monstera doing a trust fall at 2 AM.
Forcing a trailing plant to climb. Not every plant wants to go vertical. String of hearts, string of pearls, and similar trailing plants are happier hanging down. Let them be who they are.
DIY Moss Pole (Budget-Friendly Version)
If you want to make your own moss pole, it is easier than you think.
Materials:
- A wooden dowel or PVC pipe (about 3-4 feet long)
- Sphagnum moss (soaked in water for 30 minutes)
- Fishing line, twine, or thin wire
- Optional: plastic mesh or hardware cloth
Method:
- If using mesh, wrap it around the dowel to create a tube shape and secure with wire.
- Stuff soaked sphagnum moss between the mesh and the dowel (or wrap moss directly around the dowel).
- Wrap fishing line or twine tightly around the outside to hold everything in place.
- Let it drip for a few minutes before inserting into the pot.
Total cost: maybe five to ten dollars. My son helped me make one and called it a “plant tree,” which is honestly a better name.
When to Upgrade Your Support
Your plant is outgrowing its current support when:
- The plant has climbed past the top of the pole.
- The pole is leaning or wobbly.
- The stems are pulling away from the support.
- Leaves at the top are significantly larger than leaves at the bottom (this is actually a good sign - it means climbing is working).
You can stack extension poles on top of the original (many moss and coir poles are designed for this) or repot with a taller support.
Which Support Should You Choose?
If you want to keep it simple, here is my quick recommendation:
- Monstera or large philodendron? Moss pole if you will maintain it, coir pole if you want low effort.
- Pothos or syngonium? A simple bamboo stake or small trellis works fine.
- Want it to look amazing on Instagram? Cedar plank leaned against a wall. Trust me.
- On a budget? DIY moss pole or even a sturdy branch from outside (just bake it in the oven at 200 degrees for 30 minutes to kill any hitchhikers).
What to Do Next
If this is your first time staking a plant, start with whatever you have around the house. Even a chopstick in a pot of pothos is better than nothing. You can always upgrade later.
Once your plant starts climbing, you will notice the difference pretty quickly. Bigger leaves, faster growth, and a plant that actually looks like it belongs in a magazine instead of slowly tipping off a shelf.
And if you mess it up? The plant will forgive you. They always do. That is more than I can say for the photo frame my monstera knocked over.
Happy climbing.