How to Propagate Begonia Maculata: Turn One Polka Dot Plant into Many
I bought my first begonia maculata at a plant swap three years ago. It was a single leggy stem with four leaves, stuffed into a plastic cup with some damp perlite. The guy who traded it to me said, “Just stick it in water, it will root in a week.” He was right. That sad little cutting is now the mother plant to about a dozen polka dot begonias scattered across my house, my parents’ house, and a few of my neighbors’ kitchens.
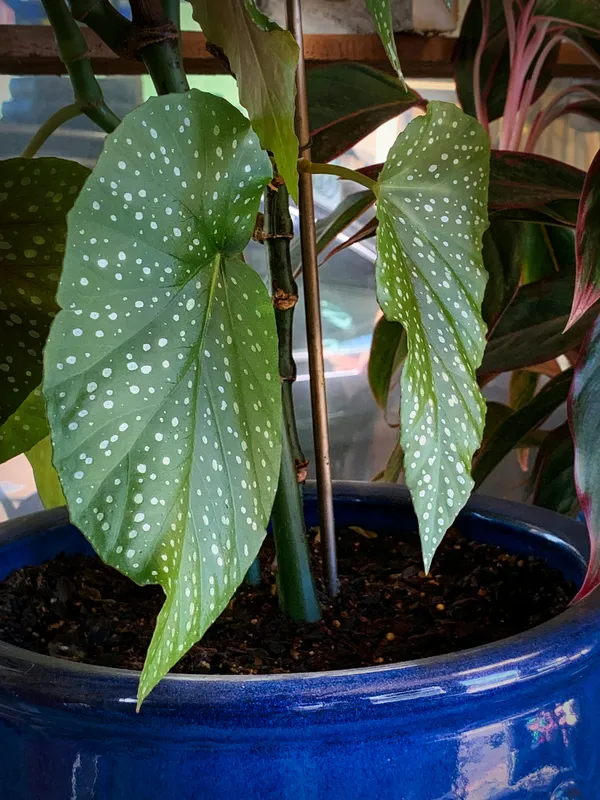
If you have a begonia maculata - or know someone who does - you are sitting on an unlimited supply of one of the most dramatic houseplants out there. Those silver-spotted, wing-shaped leaves with the deep red undersides? You can make more of them. For free. And it is genuinely one of the easiest propagations I have done.
Here is everything you need to know.
Why Begonia Maculata Is Perfect for Propagation
Begonia maculata (sometimes called the polka dot begonia or spotted begonia) is a cane-type begonia. That matters for propagation because cane begonias root extremely easily from stem cuttings. Unlike some finicky aroids that need a node with an aerial root to have a shot, begonia maculata can sprout roots from almost any point along the stem.
This means a single healthy stem can give you multiple cuttings if it is long enough. It also means the success rate is high even for total beginners. If you have ever rooted a pothos cutting in a glass of water on your kitchen windowsill, you can do this.
The parent plant benefits too. Begonia maculata naturally grows tall and leggy over time, especially if it is reaching for light. Taking cuttings encourages the plant to branch out from lower nodes, resulting in a bushier, fuller shape. So propagation is not just free plants - it is also a pruning strategy.
When to Take Cuttings
Spring and early summer are ideal. The plant is actively growing and has the energy to both recover from the cut and push out new branches. That said, I have taken cuttings in every season and had them root successfully. It just takes longer in winter.
Avoid taking cuttings from a plant that is stressed, drooping, or showing signs of disease. You want healthy tissue to give your new plant the best start.
What You Need
The supply list is short:
- A healthy begonia maculata with stems at least 4-6 inches long
- Clean, sharp scissors or pruning shears (wipe them with rubbing alcohol first)
- A glass jar or cup for water propagation, or a small pot with drainage holes for soil propagation
- Fresh water (room temperature) or well-draining potting mix
- Optional: rooting hormone powder or gel
That is it. No grow lights, no heat mats, no special equipment. A mason jar on your kitchen counter works great.
How to Take the Cutting
Look at your plant and find a healthy stem with at least two or three leaves. You want a cutting that is roughly 4-6 inches long. Longer is fine - shorter can work but gives you less margin for error.
Find a node on the stem. Nodes are the slightly bumpy points where leaves attach to the stem. You will often see a small ridge or ring at these spots. Make your cut about half an inch below a node using a clean, angled cut. The angle increases the surface area for rooting and prevents water from pooling on the cut surface.
Remove the bottom leaf or two, leaving two or three leaves at the top of the cutting. The submerged portion of the stem should be bare - leaves sitting in water will rot and turn the whole thing into a smelly mess. Trust me on this one.
If you have rooting hormone, you can dip the cut end in it. It is not required and I skip it about half the time with no difference in success rate. But if you have it on hand, it will not hurt.
Method 1: Water Propagation (Recommended for Beginners)
This is the method I use 90% of the time because it is simple, visual, and nearly foolproof.
Place your cutting in a glass jar or cup filled with room temperature water. The bottom inch or two of the bare stem should be submerged. Make sure no leaves are touching the water.
Put the jar somewhere with bright, indirect light. A north or east-facing windowsill is perfect. Direct afternoon sun through a window can heat up the water and cook your cutting, so avoid south or west-facing windows unless you pull it back a few feet.
Now the waiting game begins. Here is what to expect:
- Days 1-5: Nothing visible. The cutting is sealing the wound and preparing to root. Do not panic.
- Week 1-2: You might see small white bumps forming along the submerged stem, especially near nodes. These are root initials.
- Week 2-3: Actual roots start emerging. They will be thin, white, and delicate.
- Week 3-5: Roots grow longer and may start branching. Once they are 2-3 inches long, you are ready to pot up.
Change the water every 5-7 days or whenever it starts looking cloudy. Top it off between changes if the level drops. Room temperature water is best - cold water can shock the cutting.
One thing I love about water propagation is that you can see exactly what is happening. My kids think it is magic watching roots appear from a bare stem. My five-year-old checks our propagation jars every morning like she is monitoring science experiments. Which, honestly, she kind of is.
Method 2: Soil Propagation
If you want to skip the potting-up step later, you can root directly in soil.
Fill a small pot (3-4 inches) with a well-draining mix. I use a blend of regular potting soil, perlite, and a bit of orchid bark - roughly 60/30/10. The mix should be moist but not dripping wet. Think wrung-out sponge.
Poke a hole in the soil with a pencil or chopstick. Insert the cutting about 1-2 inches deep and gently press the soil around it to hold it upright. If the cutting wants to flop over, you can prop it up with a small stick or lean it against the edge of the pot.
Here is where soil propagation gets a bit trickier than water: humidity. Begonia maculata cuttings root best in humid conditions, and your average apartment air - especially in winter with the heat running - is pretty dry. The workaround is to create a mini greenhouse:
- Place the pot inside a clear plastic bag, leaving the top loosely open for airflow
- Or cover it with a clear plastic cup or cloche
- Or set it on a tray near your other humidity-loving plants
Check the soil every few days. It should stay consistently moist but never soggy. After 3-4 weeks, give the cutting a very gentle tug. If you feel resistance, roots have formed. Congratulations.
Do Not Mist Your Cuttings
This is important enough to get its own section. Begonia maculata is prone to powdery mildew and bacterial leaf spot, both of which thrive in wet conditions on leaf surfaces. Misting your cuttings - or the parent plant - is asking for trouble.
If you need to boost humidity, use the plastic bag method, a pebble tray, or a humidifier. Keep water off the leaves.
I learned this the hard way. My first batch of cuttings got misted daily because I thought I was being a good plant parent. Two weeks later, every leaf had fuzzy white spots. Powdery mildew. I had to trash them and start over. Lesson learned.
Potting Up Water-Rooted Cuttings
Once your water-rooted cutting has roots that are 2-3 inches long, it is time to move it to soil. This transition can be the trickiest part, but a few tips make it smooth:
Use a small pot - 3 to 4 inches in diameter. Begonia maculata does not like being overpotted. Too much soil around the roots stays wet too long and invites root rot.
Use a well-draining potting mix. The same 60/30/10 blend of potting soil, perlite, and orchid bark works well here. You want something that holds some moisture but lets excess water drain freely.
Plant the cutting at the same depth it was sitting in water. Water it thoroughly after potting and let the excess drain. For the first week, keep it in slightly lower light than its final spot to reduce transplant stress.
The cutting might look a little droopy for a few days as it adjusts. This is normal. As long as the stem is firm and the leaves are not yellowing, it is just settling in.
Common Mistakes (And How I Have Made Most of Them)
Cutting too short. A cutting with only one leaf and barely any stem has very little energy reserve. Aim for 4-6 inches with 2-3 leaves. More is better.
Leaving leaves in water. Submerged leaves rot fast and contaminate the water. Strip the bottom leaves before placing the cutting in water. Every time.
Forgetting to change the water. Stagnant, cloudy water breeds bacteria that can kill root development. Set a weekly reminder on your phone if you need to. I have a recurring Sunday reminder that just says “plant water” and my wife thinks it is hilarious.
Too much direct sun. Cuttings are more vulnerable than established plants. Bright indirect light is the sweet spot. Direct sun through a window can scorch leaves and overheat water.
Potting up too early. It is tempting to move a cutting to soil the moment you see the first tiny root. Wait until roots are 2-3 inches long with some branching. Patience pays off.
Overwatering after potting up. The roots that formed in water need time to adapt to soil. Keep the soil moist but not wet for the first few weeks. Soggy soil right after transplant is the number one killer of otherwise successful propagations.
How to Get a Bushier Plant from Propagation
Here is a trick that took me an embarrassingly long time to figure out: you can plant multiple cuttings in one pot to create an instantly full, bushy plant.
Take three or four cuttings from your mother plant. Root them all in water. When they are ready, plant them together in a single 5-6 inch pot, spacing them evenly around the edges. As they grow, you get a lush, multi-stemmed plant right from the start instead of a single lonely stem.
This is also how you rescue a leggy mother plant. Take all those long, stretched-out stems as cuttings, root them, and replant them together. You end up with a compact, full plant and have given the original a reason to branch out.
Propagation as Connection
I want to end on a personal note. My mom has never been what you would call a plant person. She keeps a few things alive - a jade plant that has been on the same shelf since I was in middle school, some lucky bamboo by the front door. But when I gave her a rooted begonia maculata cutting in a little terracotta pot, something shifted.
She calls me now to ask about watering. She sends me photos when a new leaf unfurls. She told me the other day that she moved it to a better spot by the window because it was “leaning too much.”
That is what propagation is really about, at least for me. It is not just about free plants, although free plants are great. It is about sharing something alive with the people you care about. A cutting from your plant becomes a piece of your home growing in theirs.
So take that cutting. Stick it in a jar of water. Watch the roots grow. And when it is ready, give it to someone who could use a little green in their life.
Quick Reference
- Best time: Spring and early summer (but year-round works)
- Cutting size: 4-6 inches with 2-3 leaves
- Easiest method: Water propagation in bright indirect light
- Root time: 2-5 weeks depending on conditions
- Pot up when: Roots are 2-3 inches long
- Avoid: Misting, direct sun, soggy soil, submerged leaves
- Pro tip: Plant multiple cuttings in one pot for instant fullness