Growing Watercress at Home: The Peppery Green Your Soups Have Been Missing
If you grew up in a Chinese household, you probably know watercress soup before you know watercress salad. My mom made 西洋菜汤 (watercress soup) all through the fall and winter - a slow-simmered pot with pork bones, dried dates, and goji berries. The kind of soup that takes three hours and fills the whole apartment with that deep, savory warmth. She called it a “cooling” soup, which always confused me as a kid because it was, you know, hot.
Traditional Chinese medicine classifies watercress as a cooling food - meaning it is supposed to balance excess internal heat. Whether or not you buy into that framework, I can tell you this: that soup is one of the most comforting things I have ever eaten, and the watercress is what makes it work. It adds a slightly peppery, slightly bitter backbone that keeps the broth from being one-note sweet.
For years, I bought watercress at the Chinese grocery store in those big, bushy bundles held together with a rubber band. Then one day I realized something obvious: this stuff grows in water. I have water. How hard could it be?
Turns out, not hard at all.
What Exactly Is Watercress?
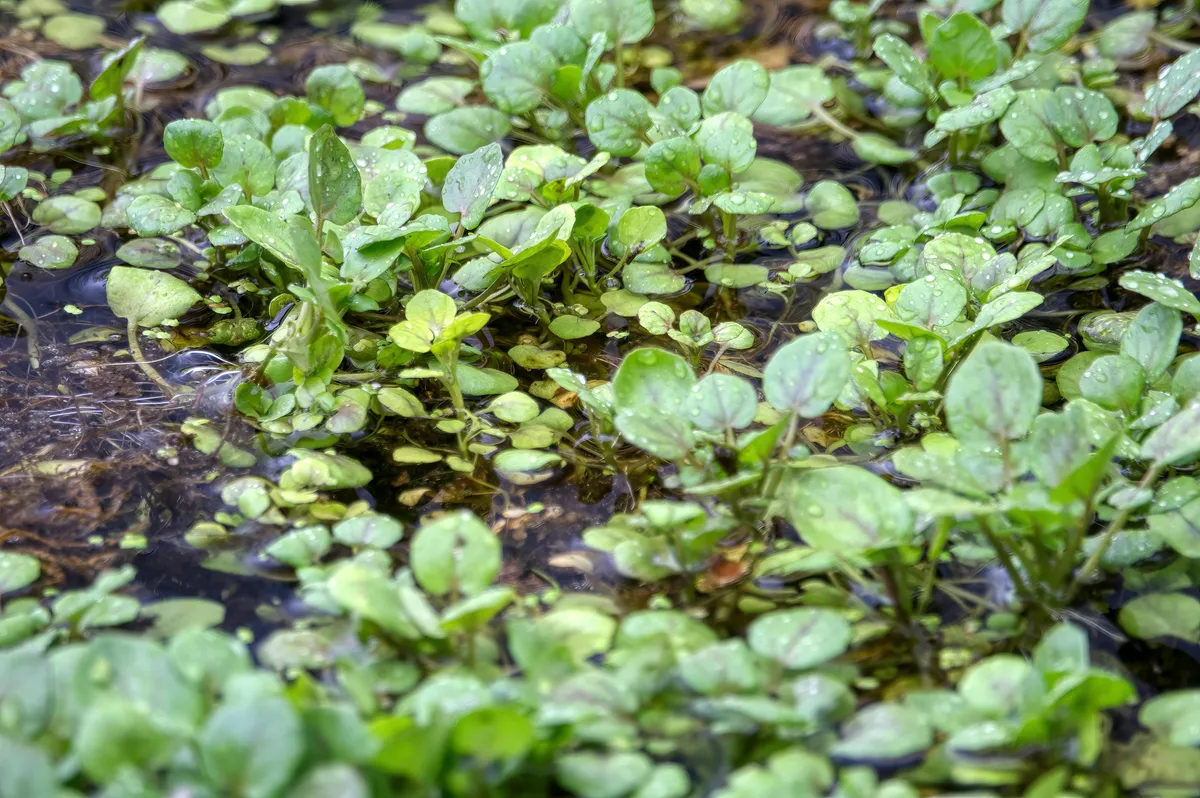
Watercress (Nasturtium officinale) is a semi-aquatic perennial plant in the Brassicaceae family - the same crew as broccoli, kale, and mustard greens. It grows naturally along streams and in shallow, slow-moving water across Europe and Asia. The leaves are small, round, and deep green, with a peppery bite that intensifies as the plant matures.
Here is a fun fact that might surprise you: the CDC ranked watercress as the single most nutrient-dense food in a study of 41 fruits and vegetables. It scored a perfect 100. Higher than kale. Higher than spinach. Higher than everything. It is loaded with vitamin K, vitamin C, vitamin A, and a respectable amount of calcium and iron for a leafy green.
My dad would have loved knowing this. He was a big believer in eating your greens, but his knowledge topped out at “bok choy is good for you.” If he had known watercress was literally the most nutritious vegetable on the planet, he would have been insufferable about it.
Why Grow It at Home?
A few reasons watercress makes sense as a home-growing project.
First, it is expensive for what you get. A small clamshell of watercress at the regular grocery store costs three or four dollars and wilts within a couple days. At the Chinese market, you can get a bigger bunch for less, but you still have a freshness clock ticking.
Second, homegrown watercress tastes noticeably better. The leaves are crisper, the peppery flavor is brighter, and you can harvest it minutes before it goes into the pot. That matters for soups especially - fresh watercress holds its color and texture much better than the stuff that has been sitting in a bag for a week.
Third, it is genuinely easy to grow if you understand its one big requirement: it needs to stay wet. Not moist. Not damp. Wet. Once you solve that problem, everything else falls into place.
The Container Setup
You do not need a stream or a pond. You do not even need a yard. A container on your kitchen counter or windowsill works perfectly.
The classic approach is a double-container system. Here is how it works:
Take a pot or planter with drainage holes - something around 6 to 8 inches wide and at least 4 inches deep. Fill it with a moisture-retentive soilless mix. A blend of peat moss (or coco coir) with perlite or vermiculite works well. You want something that holds water without turning into mud.
Now set that pot inside a larger container with no drainage holes - a plastic tub, a deep saucer, a storage bin, whatever you have. Fill the outer container with water so it reaches about 2 to 3 inches up the sides of the inner pot. The roots stay constantly wet, the growing medium stays saturated, and the watercress is happy.
That is the whole system. Refill the outer container when the water level drops. Swap the water out completely every week or so to keep things fresh and prevent mosquito issues if you are growing outdoors.
I use a rectangular plastic planter from the dollar store nested inside a slightly larger storage container. Total cost: about four dollars. It has been producing watercress on my kitchen windowsill for months.
Starting From Seed vs. Store-Bought Bunches
You have two options here, and both work.
From seed: Watercress seeds are tiny. Sprinkle them over the surface of your moist growing medium and press them down lightly. Do not bury them - they need light to germinate. Keep the surface consistently wet and you should see sprouts in 5 to 10 days. Germination is best at temperatures between 60 and 70 degrees Fahrenheit. Seeds are cheap and easy to find online.
From store-bought watercress: This is the shortcut I recommend for impatient people (which is all of us, right?). Buy a fresh bunch from the grocery store. Pick stems that look healthy - firm, with bright green leaves and no yellowing. Trim the bottom inch or so and stick the stems in a glass of water. Within a week, you should see white roots forming at the nodes. Once the roots are about an inch long, transplant them into your container setup.
The store-bought method gets you to harvest stage faster, and it feels a little like magic watching grocery store watercress come back to life and start growing new leaves.
Light and Temperature
Watercress is not a sun worshipper. It actually prefers partial shade, especially in warmer months. Four to six hours of light per day is the sweet spot. A north-facing or east-facing windowsill works well indoors. If your only option is a south-facing window with intense afternoon sun, consider using a sheer curtain to diffuse the light.
Temperature-wise, watercress is a cool-weather plant. It thrives between 50 and 70 degrees Fahrenheit. Once temperatures push above 80 degrees consistently, the plant will bolt - sending up flowers and turning the leaves bitter. This is why watercress is traditionally a fall, winter, and spring crop.
In my apartment, this works out great. The windowsill stays cool enough year-round (thanks, drafty New York windows), and the plant keeps producing steadily from October through May. During summer, I give it a break and grow Thai basil in that spot instead.
Watering (Or Rather, Never Letting It Dry Out)
I cannot stress this enough: watercress wants wet feet at all times. This is a plant that grows in streams. If the growing medium dries out even briefly, the plant will let you know with wilting leaves and a bitter taste.
With the double-container setup, your main job is checking the water level in the outer container daily. Top it off as needed. Change the water completely once a week - this prevents stagnation and keeps algae from building up.
If you are growing watercress outdoors in summer heat, you might need to check the water level twice a day. The combination of sun and heat can evaporate water faster than you expect.
One thing I have learned: use room-temperature water, not cold water straight from the tap. And if your tap water is heavily chlorinated, letting it sit out overnight before using it is not a bad idea. Watercress is not super picky, but it does appreciate clean water.
Feeding
Watercress is not a heavy feeder, but it does benefit from occasional nutrition. A diluted liquid fertilizer (half strength) every two to three weeks during the growing season keeps the leaves lush and green. I use a basic all-purpose liquid fertilizer. Nothing fancy.
If you notice the leaves getting pale or yellowish, that is usually a sign the plant could use a feeding. But honestly, if you are changing the water regularly and using a decent growing medium, watercress mostly takes care of itself on the nutrition front.
Harvesting
Here is the best part: watercress is a cut-and-come-again crop. Once the stems reach about 4 to 6 inches tall, you can start harvesting. Use scissors or pinch off stems just above a leaf node. The plant will branch out and produce new growth from below the cut.
Harvest from the outside of the plant first, working inward. This encourages bushier growth rather than leggy, stretched-out stems. Never cut more than a third of the plant at one time - leave enough foliage for it to keep photosynthesizing and bouncing back.
In my experience, a single container can produce enough watercress for a pot of soup every two to three weeks, with plenty of snipping for salads and garnishes in between. If you want more volume, just set up a second container. They are cheap enough that scaling up is easy.
Harvest Before It Flowers
Keep an eye out for small white flowers forming at the tips of the stems. Once watercress flowers, the leaves turn noticeably more bitter and the plant redirects its energy toward seed production. If you see flower buds forming, harvest aggressively. You can pinch off the flower buds to extend the harvest period, but once the plant is determined to bloom, it is hard to reverse course.
This is most likely to happen when temperatures warm up in late spring or early summer. When my plant starts showing flower buds, I take it as a sign to do one final big harvest for a soup and then start fresh with new cuttings for the fall.
Common Problems
Yellowing leaves: Usually a light or nutrition issue. Move the plant to a slightly brighter spot or give it a dose of diluted fertilizer.
Leggy, stretched growth: Not enough light. Watercress that is reaching and stretching is telling you it wants more brightness. Move it closer to the window or supplement with a small grow light.
Bitter taste: The plant is either too old, too hot, or starting to bolt. Harvest younger leaves for the mildest flavor. If the whole plant has gone bitter, it is probably time to start fresh.
Algae in the water: Change the water more frequently and make sure the outer container is not in direct sunlight. Opaque containers help prevent algae growth.
Aphids: Watercress can attract aphids, especially outdoors. A strong spray of water knocks them off, or you can use insecticidal soap. Check the undersides of leaves regularly.
How to Use Your Harvest
Obviously, soup. Cantonese-style watercress soup with pork bones is the classic for a reason. Simmer the pork bones for a couple hours first, then add the watercress in the last 30 to 45 minutes so it wilts down but does not turn to mush. A few dried red dates, some goji berries, and a slice of ginger round out the flavor.
But do not sleep on watercress in other dishes. It makes an excellent salad green - pair it with sliced pears, toasted walnuts, and a simple vinaigrette. Toss it into stir-fries at the last second for a peppery kick. Blend it into a bright green pesto. Add it to sandwiches instead of lettuce for more personality. Or do what the British have been doing forever and make watercress soup the Western way - pureed with potato and a splash of cream.
My kids are not totally sold on the peppery flavor yet, but my four-year-old will eat it in soup if there are enough noodles involved. Progress.
A Plant That Connects Generations
There is something quietly satisfying about growing watercress on a windowsill in Brooklyn and using it to make the same soup my mom made in our kitchen growing up. The recipe has not changed. The pork bones still take forever. The apartment still smells amazing for hours afterward.
My mom does not understand why I bother growing it when I can buy it for two dollars at the market on 8th Avenue. But I think she secretly likes that I care enough to try. Growing the ingredients yourself changes how you cook with them. You pay more attention. You waste less. You appreciate the flavor more because you watched it grow from a stubby little cutting into a bushy, productive plant.
If you have a windowsill and a couple of spare containers, give watercress a shot. It is cheap, fast, forgiving, and endlessly useful in the kitchen. And if you end up making 西洋菜汤 with your first harvest, send me a photo. I want to see it.