Growing Your Own Tea Plant: The Most Chinese Thing I Have Done as a Dad
My dad drank tea every single day of my childhood. Not the fancy stuff with ceremony and tiny clay pots - just a beat-up glass jar with a metal lid, half-filled with loose green tea leaves that he topped off with boiling water from a thermos. He carried that jar everywhere. To work. To the park. To my soccer games, where he sat on the sideline sipping tea while the other dads had Gatorade.
I thought it was embarrassing when I was twelve. Now I am thirty-five, and I have my own glass jar. Funny how that works.
A couple of years ago, I decided to take the tea thing one step further and actually grow a tea plant. Not a fancy herbal tea like chamomile or mint - the real thing. Camellia sinensis, the plant that gives us green tea, black tea, oolong, white tea, and pretty much every “real” tea that exists. One plant, endless possibilities, depending on how you process the leaves.
I had no idea if it would work in New York. Turns out, it works better than you would think.
What Exactly Is Camellia sinensis?
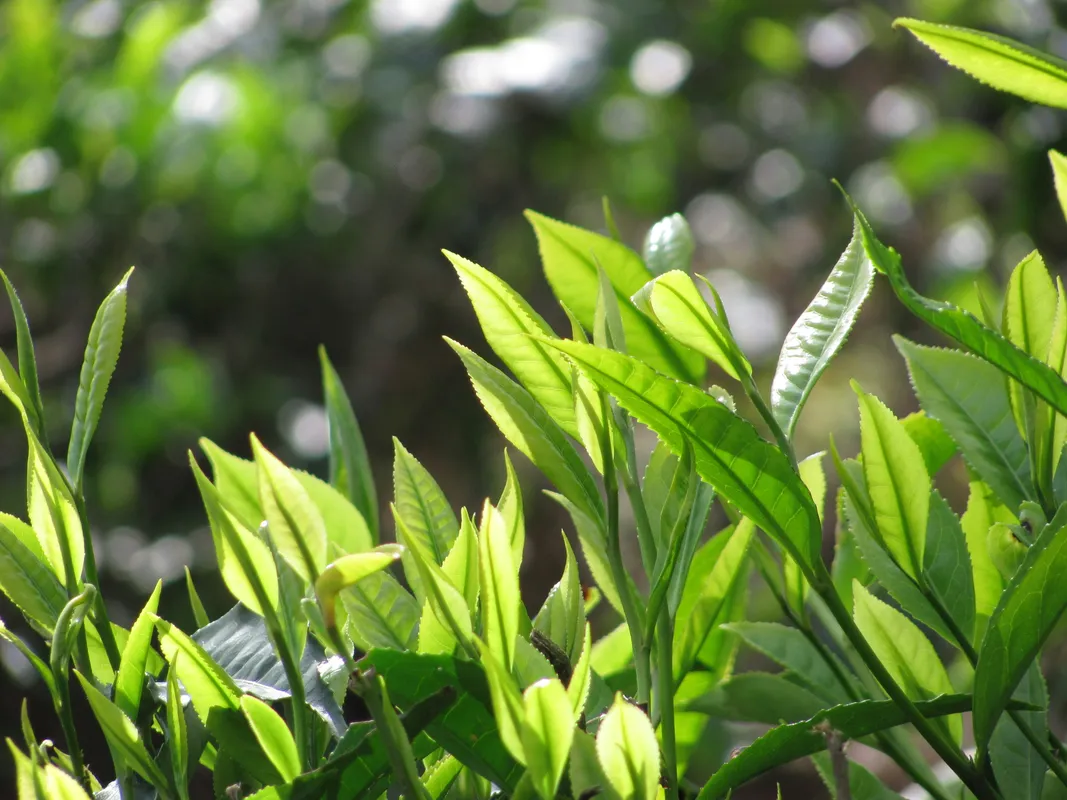
If you have ever admired a camellia bush covered in gorgeous flowers, you are already looking at a close relative. Camellia sinensis is the tea-producing species in the camellia family, and it has been cultivated in China for thousands of years. The plant itself is an evergreen shrub with glossy, dark green leaves and small white flowers that bloom in fall. Left to its own devices outdoors, it can grow into a sizable bush or even a small tree. In a pot on your patio or windowsill, it stays compact and manageable - usually topping out around two feet indoors.
There are two main varieties you will encounter. Camellia sinensis var. sinensis is the Chinese variety, which is smaller-leaved, cold-hardier, and better suited for most home growers. Camellia sinensis var. assamica is the Indian variety with larger leaves that prefers tropical heat. For growing at home, especially if you are anywhere north of Georgia, go with the Chinese variety. It can handle temperatures down to about 10 degrees Fahrenheit once established, which honestly surprised me.
Why I Started Growing Tea
I would love to tell you it was some deeply spiritual decision connecting me to my heritage. The truth is more mundane. My wife bought me a small tea plant from a local nursery as a Father’s Day gift because she said, and I quote, “You are turning into your dad anyway.” She was not wrong.
But once I had the plant, something shifted. Watching those first new leaves unfurl - bright green and tender, with that slightly fuzzy texture on the underside - felt different from watching my monstera push out another leaf. This was a plant my ancestors had been growing for over 4,000 years. My grandmother picked tea in Fujian province as a girl. And here I was, a Chinese American dad in New York, growing the same species on my back patio.
My five-year-old asked what the plant was, and I told him it was a tea tree. He asked if he could drink it. I told him we had to wait a couple of years. He lost interest immediately. Kids.
How to Get Started
You can buy a Camellia sinensis plant online or at well-stocked nurseries. I would recommend starting with a plant that is at least a year old rather than trying to grow from seed. Seeds can take months to germinate and years to reach a harvestable size. A nursery plant gives you a head start and costs somewhere between fifteen and thirty dollars depending on size.
When your plant arrives, the first order of business is soil. Tea plants are acid lovers, similar to blueberries and azaleas. They want a soil pH between 4.5 and 6.5. Regular potting mix is usually too alkaline. I mix my own using about half peat moss or coco coir, a quarter perlite for drainage, and a quarter acidic compost or composted pine bark. If you want to keep it simple, grab a bag of azalea and camellia potting mix from the garden center. It works great.
For containers, go bigger than you think. An 18-inch pot minimum, with good drainage holes. Tea plants develop substantial root systems, and a cramped pot will stunt growth and reduce leaf production. I started in a 12-inch pot and had to repot within six months because the roots were already circling.
Light and Location
Here is the good news: Camellia sinensis is not as fussy about light as some houseplants. It does best in bright, indirect light but can handle some direct morning sun. If you are growing it outdoors on a patio or balcony, a spot with morning sun and afternoon shade is ideal. Think of where tea grows naturally - misty mountainsides in southern China, not blazing desert.
Indoors, an east-facing window is perfect. A south-facing window works too, but you might want to pull it back a foot or two during the hottest summer months. I keep mine outdoors from May through October and bring it inside for winter, which seems to be the sweet spot in the New York climate.
One thing to know: tea plants appreciate humidity. New York apartments in winter are basically the Sahara once the radiators kick on. I keep a humidity tray under mine and mist it a couple of times a week. A humidifier nearby helps too, if you have one running for the calatheas already. (You know who you are.)
Watering and Feeding
Water consistently but do not overdo it. The soil should stay evenly moist - not soggy, not bone dry. Stick your finger an inch into the soil. If it feels dry, water thoroughly until it drains from the bottom. If it still feels damp, leave it alone. Tea plants are more forgiving than calatheas in the watering department, but they absolutely do not like sitting in water. Root rot is the number one killer.
For fertilizer, use an acid-loving plant formula (the same stuff you would use for azaleas or rhododendrons) once a month during the growing season, which is spring through early fall. Cut back to nothing in winter. I use a liquid fertilizer at half strength because I would rather underfeed than burn the roots. The plant has never complained.
The Waiting Game
Here is where patience comes in, and I say this as a person who has very little of it. Your tea plant needs about two to three years of growth before you should start harvesting leaves. I know. Two to three years feels like forever when you are staring at a small bush willing it to grow faster.
During this time, let the plant establish a strong root system and develop plenty of branches. You can do some light pruning to encourage bushiness - just pinch off the growing tips occasionally. A bushy plant means more growing tips, which means more harvestable leaves down the road.
In the meantime, enjoy the plant for what it is. It is genuinely attractive, with those glossy evergreen leaves and compact form. And in fall, you might get small, delicate white flowers with yellow centers. They smell faintly sweet. My wife said the flowers alone were worth the price of the plant, which I am choosing to interpret as a compliment to my gardening skills.
Your First Harvest
When your plant is mature enough, harvesting is simple but specific. You want the youngest growth - specifically, the bud and the top two leaves of each new shoot. This is called “two leaves and a bud,” and it is the standard across the tea world, from artisan farms in Yunnan to your back patio in Queens.
The best time to harvest is in spring when the plant pushes out fresh growth, though you can get multiple flushes throughout the growing season. Use your fingers or small scissors and be gentle. Regular harvesting actually encourages the plant to produce more new growth, so you are not hurting it - you are helping it.
Making Tea From Your Leaves
The simplest version you can make at home is green tea. Here is the basic process:
Spread your freshly picked leaves on a clean towel and let them wilt for a few hours. They should feel soft and flexible, not crispy. Then you need to “kill the green” - this is the step that stops oxidation and keeps the tea green. Pan-firing is the traditional Chinese method: heat a dry skillet or wok over medium heat and toss the leaves around for a couple of minutes until they soften and become fragrant. Be careful not to scorch them.
After pan-firing, roll the leaves between your palms to shape them and release the juices. Then spread them on a baking sheet and dry them in a low oven - around 215 degrees Fahrenheit for 10 to 12 minutes, flipping every five minutes. When the leaves are completely dry and crackly, you are done.
Store your finished tea in a sealed glass jar away from light and moisture. Brew it the way my dad does: a pinch of leaves in a cup, hot water just off the boil, steep for two to three minutes. That first sip from your own homegrown leaves is something else. It might not be as polished as the premium longjing you buy from the tea shop, but the flavor is clean, fresh, and earned.
I texted my dad a photo of my first cup. He sent back a thumbs up emoji and then called to tell me the leaves looked too big and I probably picked them too late. Classic dad move.
Common Problems and How to Fix Them
Yellowing leaves: Usually means the soil is not acidic enough. Test your soil pH and amend with sulfur or switch to an acidic potting mix. It can also mean overwatering - check the roots for mushiness.
Brown leaf tips: Low humidity, most likely. Increase humidity with a tray, misting, or a humidifier. Also check if the plant is too close to a heating vent.
Dropping leaves: Often caused by sudden temperature changes, like bringing the plant inside for winter without a gradual transition. Acclimate it over a week or two, moving it from outside to a sheltered porch before bringing it fully indoors.
No new growth: If the plant seems stalled, it might need more light or a bigger pot. Tea plants are not heavy feeders, but they do need room to grow.
Scale or aphids: Check the undersides of leaves regularly. A spray of neem oil or insecticidal soap handles most pests. I check my tea plant every time I water it - a 30-second inspection saves a lot of headaches.
What This Plant Means to Me
I am not going to pretend I am running a tea plantation here. My one Camellia sinensis produces maybe enough leaves for a dozen cups of tea per year. I could buy better tea for less effort, and my dad reminds me of this regularly.
But there is something about the process that I cannot get from a store. Picking the leaves with my kid. Watching him try to roll them between his tiny palms. Telling him that his great-grandmother did something like this when she was young, on a mountainside very far away.
He still asks about the tea tree sometimes. He wants to know when his leaves will be ready. I tell him soon, and he runs off to play, and I stand there in the kitchen with the smell of pan-fired tea leaves and the feeling that maybe I am passing down something small but real.
My dad’s glass jar sits on my counter now. He gave it to me last Christmas, along with a bag of longjing and a short lecture about water temperature. I use it every morning. Sometimes I fill it with tea from a bag. Sometimes I fill it with leaves I grew myself.
Either way, it tastes like home.
Getting Started Checklist
If you want to try growing your own tea plant, here is what you need:
A Camellia sinensis var. sinensis plant from a nursery or online seller. An 18-inch or larger pot with drainage holes. Acidic potting mix (azalea/camellia mix works great). A spot with bright, indirect light or gentle morning sun. Patience - two to three years before your first real harvest. A parent, grandparent, or memory of someone who drank tea every day. (Optional, but it helps.)
Welcome to the club. Your dad would be proud.